Build a custom loom to fit your own weaving needs. Our clear video tutorial walks you through assembling the loom, warping and preparing the shed.
Project Summary
• Work Time: 30 minutes
• Total Time: 30 minutes
• Skill Level: Beginner
• Approximate Cost: $20
There’s something magical about owning a handmade textile. With this guide, you’ll learn how to build a loom for your own weaving projects from the ground up. No matter whether you’re looking to hone your skills or simply make a trendy woven wall hanging, this DIY loom is the perfect place to begin. It’s simple to assemble—just drive in tacks of an even spacing into a piece of wood or a canvas stretcher and thread it with yarn of medium weight to create the warp. Follow along below to see how to mark nail spots, thread the warp, and prepare your loom for weaving.
What You’ll Need
Equipment/Tools
• Ruler
• Hammer
• Pencil
• Scissors
Materials
• 12×16-inch wood frame or canvas stretcher
• 3/4-inch nails
• Cut dowel, same width as the frame
• Cardboard
• Painter’s tape
Instructions
Source: bhg.com
1. Mark the Frame
Measure in 1/2 inch from the inside corner at both short sides of the frame and mark them. Then, on the longer sides, measure in 1/2 inch and continue to mark along the bottom edge in 1/2-inch increments. Repeat along the top edge too. Then, drive nails into each mark.
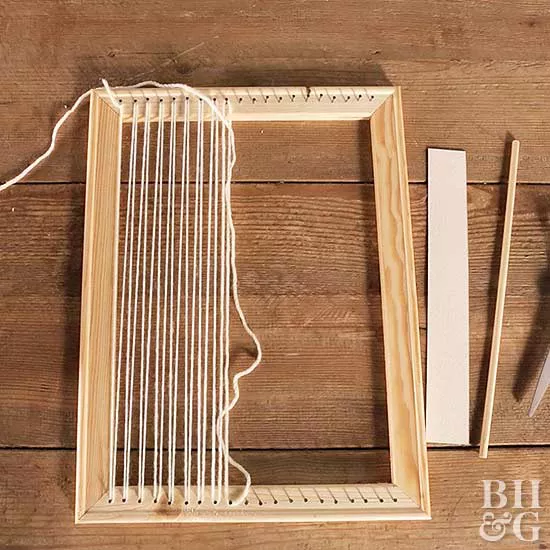
2. String the Loom
To create the warp—the up-and-down threads for weaving—attach one end of your yarn to the bottom left nail. Take the yarn straight up to the top left nail, wrap around, and back to the second nail at the bottom. Keep wrapping and threading in this zigzag pattern across the loom until you reach the last nail. Keep your tension tight and even for the best weave. Tie off the yarn on the last bottom-right nail.
3. Cut Cardboard
Trim a piece of cardboard to be about 1-1/2 inches wider than your loom (we used dimensions of 1-1/2×11 inches). Weave the cardboard across the warp strands at the bottom of the loom to make it easier to remove your finished weave later on.
4. Insert Dowel
Cut a dowel to the same width as the frame. Pass the dowel through the warp strings, the opposite direction of the pattern on the cardboard below. Push it towards the top of the frame—this will be your shed, making it convenient to lift every other warp thread when you weave. To keep the warp in position while you weave, tape down the bottom row of nails with a piece of painter’s tape.