All You Need Are Your Hands to Get Started
If you’ve been to Target in the past year or scrolled through #homedecor on Instagram, you’ve likely seen this month’s mania: decorative knot sculptures. Fortunately, making your own polymer clay knot is simple—and cheaper than the ones available in stores. And best of all, you can choose colors that you love best. We’re showing you how to make three stylish polymer clay knot designs. After you feel at ease with rolling and smoothing the clay, try making your own unique shapes and knots. This simple DIY project requires no special tools—just your hands and a little patience.
How to Make Clay Knot Sculptures
What You’ll Need
• Polymer clay
• Sharp knife
• Baking tray
• Oven
Step-by-Step Instructions
Create your own beautiful polymer clay knots by following these easy steps. This simple DIY project takes less than an hour, not including baking and cooling time.
Step 1: Prep Your Clay
To create these long-lasting knot sculptures, we used cheap polymer clay. It is easy to work with, durable when hardened, and available in a wide range of colors. We used white, caramel, and black for our knot clay. Figure on using about ½ pound of clay per knot.
Cut the clay in half, and roll each of them into a tube approximately 1 inch thick. For the caramel knot, roll one tube measuring 14 inches long. For the white and black designs, roll two tubes for each of them. Use a knife to flatten the ends for a cleaner look.
Step 2: Form the Knots
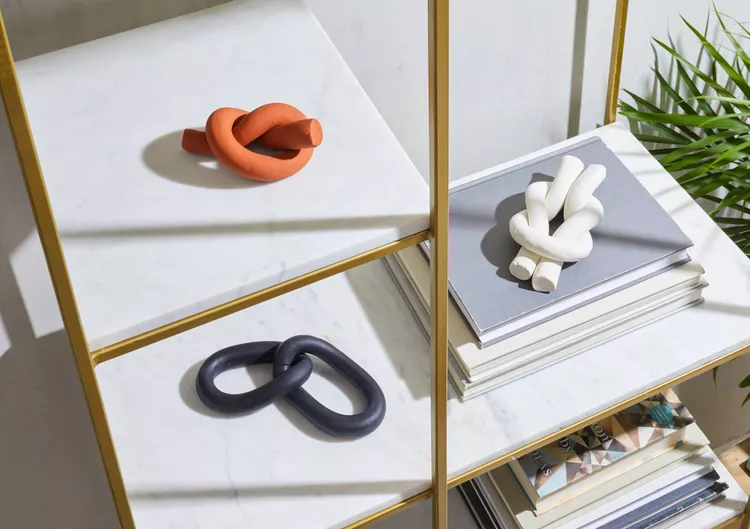
For a basic knot, roll the caramel-colored clay into coils and pull on one of the ends through the loop.
To create the white square knot, bend both tubes into the shape of a U. Cross them with ends away from each other. Pass opposite loops through the ends and hold them together gently.
For the black links, connect one tube of clay together in a circle and smooth the join with your fingers. Oval it out and then push the second tube through to make another loop. Connect and smooth the second tube to finish the link.
Step 3: Bake and Style
Set your clay items on a baking dish and bake according to the box’s instructions at a low heat. Allow them to cool completely before removing them from the pan. Use the knots as fashion-forward tabletop decorations or put them on a bookshelf. They can also be used as distinctive handmade gifts for hostesses or housewarming. Remaining clay? Create a matching set of DIY marbled coasters instead.