Join the ranks of sewing essentials with this adaptable carryall. Choose two fabrics—one for the outside and one for the lining—and stitch up the contemporary shape in no time.
Whether you’re gathering your knitting notions or dashing to the shop, this stylish, reusable tote is essential. Three interior pockets on both sides provide ample space for all your must-haves (and more!). Our version of a Japanese knot bag is easy to make—just download our free printable pattern to get underway. After you’ve finished this simple project, try using your leftover fabric to create a six-pocket bag or roomy canvas tote.

Credit: Jacob Fox
How to Make a Fabric Knot Bag
Once you’ve created your pattern and cut your materials, this trendy knot bag comes together quickly!
Supplies Needed
• Paper (for your template)
• Pencil
• Scissors
• Quilter’s pins
• ½ yard of print A (exterior)
• ¾ yard of print B (lining)
• 18×44-inch piece of thin quilt batting or craft fleece
• Sewing machine
• Thread
• Iron
• Ironing board
Reusable Bag Finishing Tips
To make a pattern for the Japanese knot bag, sketch it onto a large piece of paper and cut it out. Mark the placement of clips and dots on your fabric and pattern. All measurements assume 42 inches of usable fabric width and ¼-inch seam allowances are included. Sew right sides together unless otherwise noted. The finished bag will measure about 13 x 18 inches.
Step-by-Step Instructions
With a few basic supplies and these instructions, you’ll be able to complete your own fabric knot bag in about an hour or so.
Step 1: Cut Fabric Pieces
Cut your fabric pieces as follows:
• From print A, cut: 1 of the Bag Pattern and 1 reversed
• From print B, cut: 1 of the Bag Pattern and 1 reversed, and two 6½ x 15-inch rectangles
• From batting, cut: 2 of the Bag Pattern
Source: bhg.com
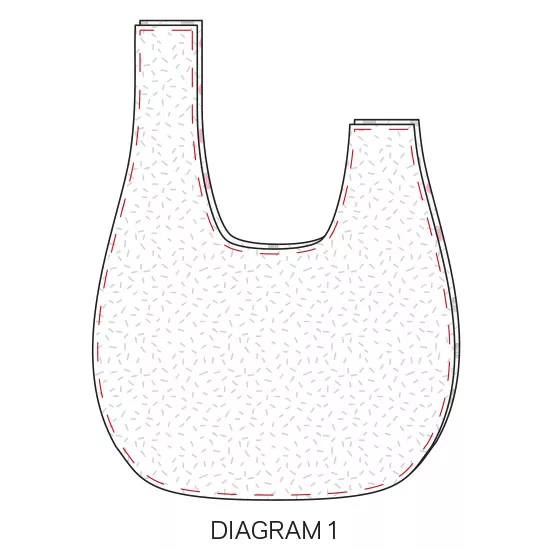
Step 2: Layer and Baste
Place each batting piece behind the wrong side of the print A pieces. Machine-baste them ¼ inch from the edges to form the front and back of the bag (see Diagram 1).
Source: bhg.com
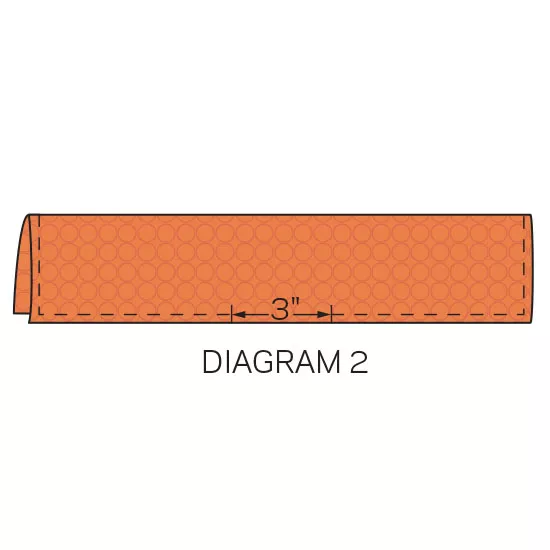
Step 3: Make Interior Pockets
Fold one 6½ x 15-inch B print rectangle lengthwise to create a 3¼ x 15-inch piece. Sew along three open edges, with a 3-inch turning gap on the bottom (Diagram 2). Turn right side out. Press flat and fold raw edges in. Create the second pocket in the same manner.
Source: bhg.com
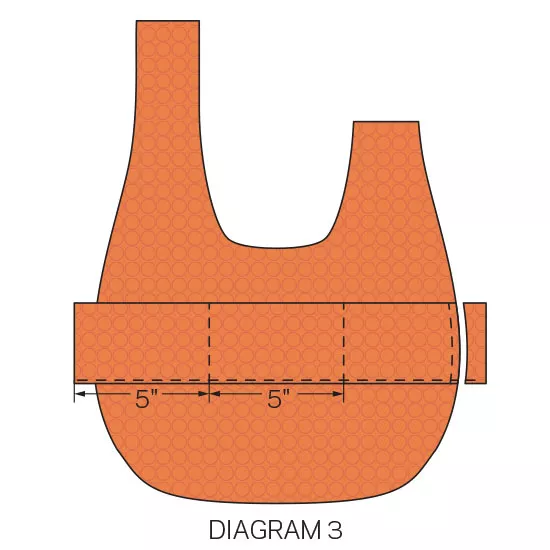
Step 4: Attach Pockets
Center a pocket on the widest part of each B print bag piece. Pin. Topstitch along the bottom edge, then sew two vertical lines 5 inches apart to divide each into compartments (Diagram 3). Trim pocket edges along the curve of the bag and baste ¼ inch from the edge to complete the lining pieces.
Source: bhg.com
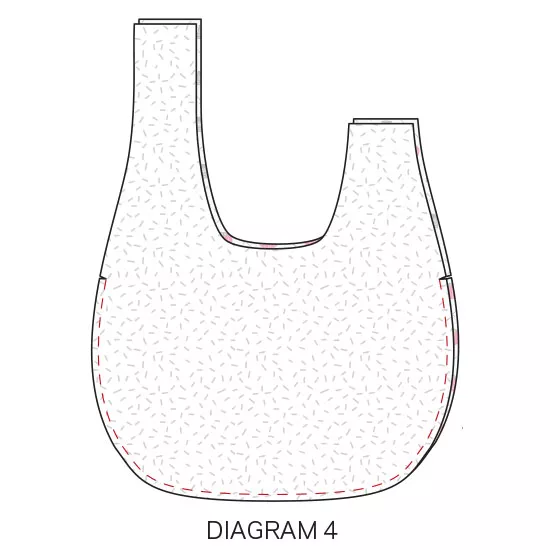
Step 5: Make Bag Exterior
Right sides together, sew front and back of bag body from clip to clip along bottom and side edges (Diagram 4). Clip into seam allowance as marked. Right side out and press flat.
Source: bhg.com
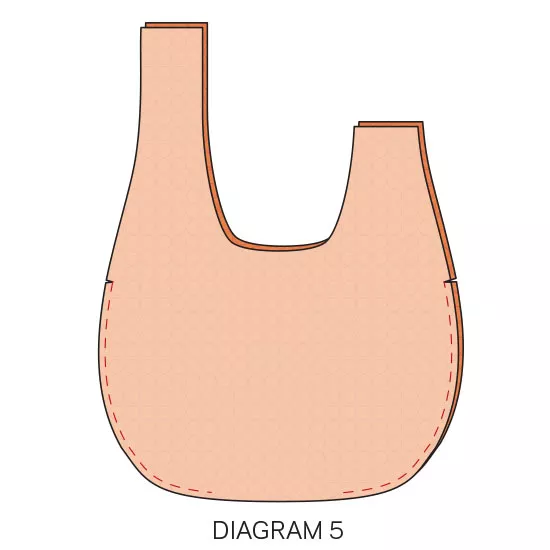
Step 6: Make the Lining
Repeat Step 5 for lining, leaving opening between dots in bottom seam for turning (Diagram 5). Do not turn lining right side out.
Source: bhg.com
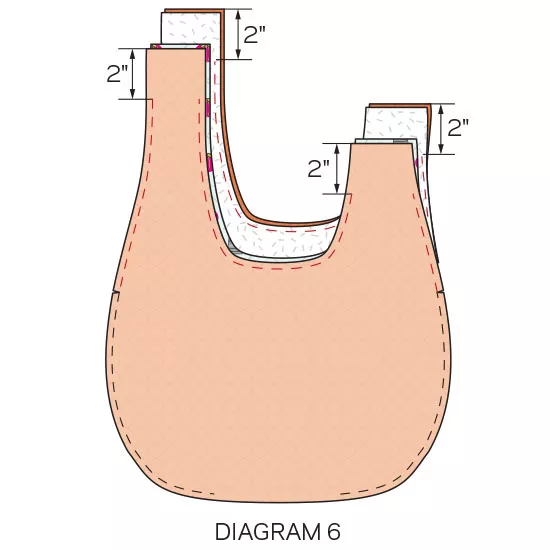
Step 7: Attach Bag and Lining
Place the body of the bag inside the lining, right sides together. Stitch around the inner and outer edges, with a 2-inch gap at the top ends (Diagram 6). Turn the bag through the bottom opening of the lining. Hand-stitch the opening closed. Press the body inside the lining so that the wrong side is out.
Source: bhg.com
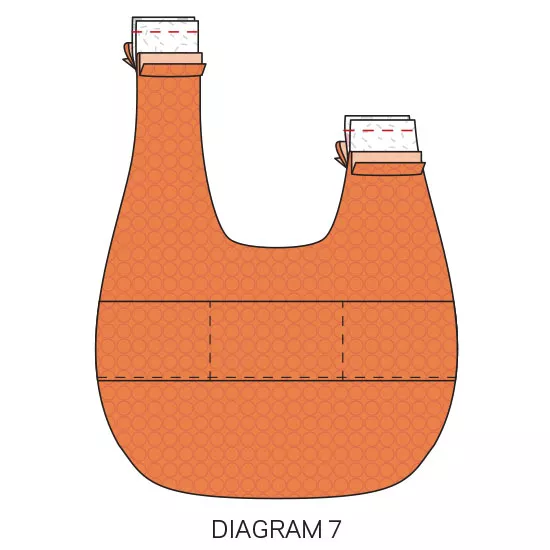
Step 8: Join the Handles together
Press less than ¼ inch along the handle edges of the lining. With the lining aside, pin and sew the long handle ends of the outer bag with a ½-inch seam (Diagram 7). Repeat with the short handles.

Source: bhg.com
Step 9: Finish the Handles
Tuck the other raw edges of the handles under. The lining handle should be overlapped slightly. Pin, turn the bag right side out, and topstitch around the entire bag to secure the handles and finish your bag.